Three Steps to Creating Your Ideal Office Workstation
08/06/2019
Are you uncomfortable at your workstation? Do you know what your proper desk setup should be? Do you think it’s too difficult or costly to request an ergonomics assessment? The truth is that you can assess your own workstation in three steps and quickly make changes that will allow you to work more comfortably.

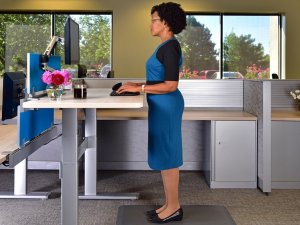
Step 1: Desk height
Whether you’re standing or seated, your shoulders should be fully relaxed, with your elbows close by your sides.
Is your desk height adjustable? If yes, then let’s start by getting your chair to the right height for seated work. Adjust your chair so that your feet are firmly on the floor with your thighs parallel to the floor.
For both seated and standing work, make sure that your forearms are also parallel with the floor; this is your “seated (or standing) elbow height.”
Next, position your keyboard and mouse close to you, so you are not extending your elbows. With your hands on your keyboard, your wrists should be straight, not bending up or down.
Finally, if your desk isn’t height adjustable, adjust your chair to achieve your seated elbow height. If the resulting chair height is too high, place your feet on a footrest. If the chair height is too low, place blocks under the legs of your desk to raise it and repeat the chair adjustment process.
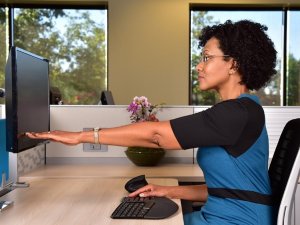
Step 2: Monitor position
Ergonomists look at two things with regard to monitor positioning: height and distance.
When looking straight ahead with your head level, the top of the viewable screen should be at, or just below, eye level. You shouldn’t have to bend your neck to view your screen.
Place your monitor approximately an arm’s length away. Sit in your natural typing position with your back fully against the chair’s backrest. Without leaning forward, reach an arm out toward your monitor; you should be able to touch the screen with your fingertips.
Examine your overall posture while using the monitor. If you are leaning forward, move the monitor a few inches closer. If you find that you push yourself back from your desk and reach to your keyboard and mouse, move the monitor a few inches back. With a little fine tuning, you can create a viewing distance that is perfect for your eyesight.
Step 3: Chair adjustment
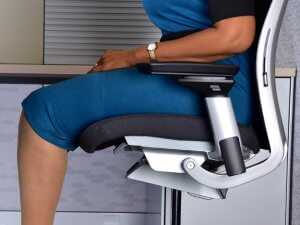 Most “ergonomic” chairs are highly adjustable, allowing users to achieve the best position for their stature and for full spine support. Common adjustments are seat pan depth, lumbar support, and backrest tension.
If the seat pan is positioned too far forward, making it impossible for your back to touch the backrest, you’ll experience pressure on the backs of your legs and knees. Ideally, you want a gap of two to three finger widths between the front edge of the seat pan and the backs of your knees.
Using the pad or knob, move the lumbar support up or down so that the largest portion of the backrest curve fits directly into the small of your lower back. Then make small adjustments until you find the spot where it feels most comfortable.
The backrest tension control is typically a round knob, often with plus (+) and minus (-) symbols on it. This knob controls how easily the backrest will recline. If you find that the backrest moves too easily and won’t stay in place, tighten the tension by turning the knob toward the plus symbol. If you find that you can’t recline in your chair, turn the knob toward the minus symbol. Each turn of the knob is a micro-adjustment; for a noticeable difference in the tension, you may need to turn the knob 10 to 15 times, maybe more.
View our short video about office chair adjustments for more visual guidance.
Now, pat yourself on the back! You’ve just made simple changes that will increase your comfort and efficiency every day.